- Home August 5, 2012
- HM News September 21, 2012
- The Mill August 4, 2012
- For New Residents November 17, 2019
- Master Association August 9, 2012
- Scams and Fraud December 10, 2022
- Security (HM) August 9, 2012
- Facilities August 25, 2012
- FiOS Information February 9, 2017
- Hershey’s Mill Pool May 13, 2018
- History August 5, 2012
- Maps & Directions January 7, 2015
- Trash & Recycling January 18, 2022
- Activities August 4, 2012
- Art Group March 31, 2023
- Bus Trips September 14, 2012
- Cards & Games April 28, 2022
- Singers, Theater & Music January 15, 2020
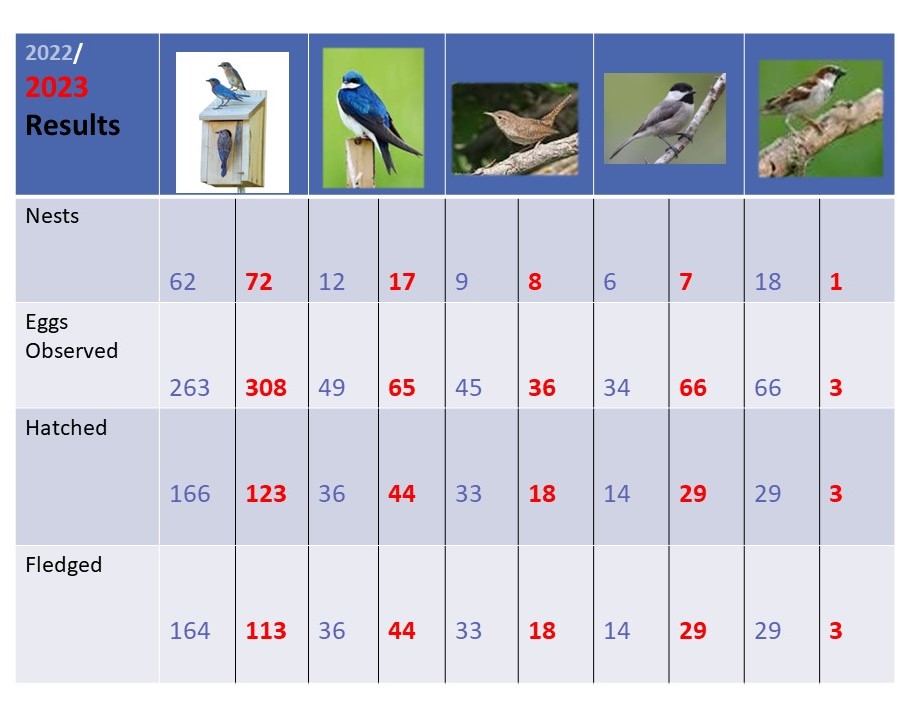
- HMNG (Nature Group) June 30, 2020
- HMS (sports) February 2, 2013
- Wine Club April 8, 2024
- Woodshop at HM October 21, 2022
- Garden Information July 17, 2015
- Merry Makers December 21, 2013
- Other Activities September 5, 2012
- Adding/Updating your Activity February 2, 2013
- Calendar August 11, 2012
- TV & Digest August 4, 2012
- Resources August 4, 2012
- Area & Government Links June 9, 2020
- Contacts January 7, 2015
- FIOS tips November 22, 2017
- Fraud prevention May 4, 2016
- HM Yellow Dot Plus May 18, 2024
- Landscaping/Planting Ideas for Residents October 19, 2016
- Tech Tips (from G&D) July 15, 2024
- FIOS July 15, 2024
- A User’s Guide for our Hershey’s Mill Website plus a FIOS Tip (Jan 2020) November 25, 2019
- Correcting FIOS Set Top Box Problems (Oct 2018) August 21, 2018
- FIOS June 24, 2018
- FIOS and Power Outages (Oct 2019) August 29, 2019
- FIOS Favorites (Sept 2018) July 23, 2018
- FIOS Router Password (Jan 2019) November 21, 2018
- FIOS Tips – WI-FI and Set Top Box Timer (July 2018) May 25, 2018
- Optimize FIOS TV (June 2018) April 24, 2018
- Robo Calls and FIOS (May 2018) March 26, 2018
- The Switch to Verizon FIOS (Apr 2017) February 22, 2017
- Understanding FIOS 150/150 Internet Connection Speeds (Aug 2018) June 24, 2018
- Verizon FIOS Transition (Feb 2018) December 24, 2017
- Verizon Problem of TV Turning Back on After Turning Off (Feb 2024) December 19, 2023
- Television and Phone Technology Tips August 21, 2012
- Computer Security Tips August 21, 2012
- 2015 Computer Security Summary October 9, 2013
- AdwCleaner December 22, 2014
- AI (Artificial Intelligence) Can Crack Passwords (June 2023) April 28, 2023
- Anti-Malware Program August 21, 2012
- Anti-Virus Program – Choosing August 21, 2012
- ANTI-VIRUS SOFTWARE 101 August 21, 2012
- Bitdefender Free Antivirus (Sept 2017) July 24, 2017
- Browser Security – Updated (May 2017) March 22, 2017
- Computer Privacy (Dec 2022) October 24, 2022
- Credit card hacked (Dec 2021) October 23, 2021
- Increase Your Windows XP Security August 1, 2014
- Is your PC Hacked? (Aug 2024) June 23, 2024
- Malwarebytes Anti-Malware Version 3 (Mar 2017) January 25, 2017
- Malwarebytes Version 3.6.1 (Nov 2018) September 28, 2018
- Microsoft Edge and security (Feb 2022) December 19, 2021
- Microsoft Store Ads On-Off (Nov 2024) September 24, 2024
- Privacy – Windows 11 (May 2023) March 28, 2023
- Ransomware (Feb 2019) December 24, 2018
- Ransomware (July 2021) May 25, 2021
- Rogue Anti-Virus Infections August 21, 2012
- Toolbars August 21, 2012
- Virtual Private Networks – VPN’s (July 2022) May 27, 2022
- Vishing & Quishing (July 2024) May 23, 2024
- Windows XP – Security August 1, 2014
- General Computer / Printer Tips August 21, 2012
- 6 Emergency Procedures to Shut Down/Reboot Windows 10/11 (Aug 2023) June 27, 2023
- AI Tool – Copilot (Jan 2024) November 23, 2023
- Backing up Your Computer’s Files (Mar 2021) January 19, 2021
- Browser – “New” Microsoft Edge (Sep 2020) July 20, 2020
- Buying a New Computer (Feb 2020) December 22, 2019
- ChatGPT (Mar 2023) January 24, 2023
- Computer Networking (Jan 2018) November 22, 2017
- Copying Photos From a Mobile Phone to a Windows 10 PC (Aug 2019) June 23, 2019
- Core Isolation – Memory Integrity (Nov 2022) September 25, 2022
- DISM and SFC File Repair Tools (Sep 2023) July 23, 2023
- Fingerprint Reader, Setting up (Oct 2022) August 23, 2022
- Hold Down the Power Button – A Quick Tip (Mar 2018) January 23, 2018
- Improve Startup Performance for Windows 10 (Nov 2021) September 24, 2021
- Keyboard Shortcut Saves Keystrokes (Dec 2023) October 26, 2023
- Keyboard Shortcuts August 21, 2012
- Laptop (Win10) Touchpad (Feb 2021) December 23, 2020
- Laptop Batteries August 21, 2012
- Laptop Battery – Extend Your Usage (July 2023) May 25, 2023
- Laptop Maintenance May 26, 2013
- LibreOffice (Apr 2019) March 30, 2019
- Maintain & Clean up Your Windows (Apr 2018) February 23, 2018
- Maintenance Importance August 21, 2012
- Microsoft Edge – Install Web Sites as Apps (Aug 2022) June 24, 2022
- Microsoft Sound Recorder (Windows 11) (Named Voice Recorder in Windows 10)(Nov 2023) September 24, 2023
- Microsoft’s PC Manager (Apr 2024) February 23, 2024
- More on AI (Artificial Intelligence)-Apr 2023 February 26, 2023
- Optimizing Windows 10/11 (May 2022) March 23, 2022
- PC Ad Blockers (Updated – June 2022) April 23, 2022
- Printer Trouble Shooting August 21, 2012
- Printer Trouble Shooting #2 April 12, 2013
- Protecting Your Computer August 21, 2012
- Registry Backups (Sep 2019) July 23, 2019
- Restarting Your Computer – the right way (Apr 2022) February 21, 2022
- Screen Readability August 21, 2012
- Set Your Router’s QOS (Quality of Service) (Dec 2017) October 25, 2017
- Setting up a New Windows 8.1 PC February 23, 2015
- Setting up a Windows 8.1 Computer April 1, 2014
- Solid State Drives (SSDs)-June 2015 April 20, 2015
- Spouse Computer Training August 21, 2012
- Tablet Computers August 21, 2012
- Toolbars August 21, 2012
- What is 5G? (Apr 2020) February 25, 2020
- When to Install a Feature Update in Windows 10 (Jan 2022) November 22, 2021
- Wi-Fi Password for Windows 10 or 11 (May 2024) March 24, 2024
- Windows 10 Health Check (May 2020) March 23, 2020
- Windows 10 (Aug 2015) June 24, 2015
- Windows 10 – A Quick Introduction (Sept 2016) July 24, 2016
- Windows 10 – New Screenshot Tool (Aug 2021) June 20, 2021
- Windows 10 – Removing the Nag Notice (May 2016) March 29, 2016
- Windows 10 – The Future of the PC February 2, 2015
- Windows 10 Action Center (July 2016) May 23, 2016
- Windows 10 Oddball Problems (July 2020) May 24, 2020
- Windows 10 Personalization (Dec 2015) October 19, 2015
- Windows 10 Printers (Dec 2016) October 25, 2016
- Windows 10 Privacy Settings (Nov 2015) September 23, 2015
- Windows 10 Privacy – Revisited (Aug 2017) June 25, 2017
- Windows 10 Reliability Monitor (Nov 2017) September 23, 2017
- Windows 10 Repair & Recovery (Feb 2016) January 31, 2016
- Windows 10 Safety Net (Nov 2016) September 21, 2016
- Windows 10 Shortcuts for Settings (Nov 2020) September 22, 2020
- Windows 10 Taskbar (Mar 2016) January 30, 2016
- Windows 10 Themes (Feb 2017) December 19, 2016
- Windows 10 Toolbox (May 2019) November 23, 2016
- Windows 10 Updates – What You Need to Know (Aug 2020) June 25, 2020
- Windows 10 Version 1903 (Nov 2019) October 5, 2019
- Windows 10 Version 1903 Disk Cleanup (Dec 2019) October 22, 2019
- Windows 10 – New Feature Updates (July 2019) May 27, 2019
- Windows 10 – Privacy (Oct 2021) August 23, 2021
- Windows 10, Getting started (Oct 2015) August 25, 2015
- Windows 11 Update: 24H2 (Dec 2024) October 22, 2024
- Windows 11 – What? (Sep 2021) July 21, 2021
- Windows 7 August 21, 2012
- Windows 8 and 8.1 Hibernation File Setting October 23, 2014
- Windows 8.1 October 21, 2012
- Windows 8.1 – Restore, Refresh or Reset (July 2015) May 26, 2015
- Windows 8.1 – Using July 15, 2015
- Windows 8.1 computer – Setting Up April 26, 2014
- Windows Keyboard Shortcuts (Jan 2016) November 19, 2015
- Windows Update Issues (Feb 2023) December 20, 2022
- Windows Update Reliability (Dec 2018) October 23, 2018
- Windows Update – Update (June 2021) April 23, 2021
- Wireless Networking (Wi-Fi) in Windows 10 (Oct 2017) August 20, 2017
- Computer Internet & eMail Tips August 21, 2012
- ADS – Block Web Ads – Use Adblock Plus November 8, 2014
- Are You Really Safe from Malware? August 21, 2012
- Comcast Email – Spam (June 2020) April 21, 2020
- Comcast Email Issues (Oct 2020) August 25, 2020
- Comcast Inbox Emails (Jan 2021) November 19, 2020
- Google’s Chrome Browser August 21, 2012
- Improving Wi-Fi Signal Strength (Oct 2024) August 24, 2024
- Internet Browser – Solving Problems December 8, 2013
- Internet Explorer Problems January 1, 2014
- Phishing Emails October 21, 2012
- Using Google August 21, 2012
- Windows Live Mail August 21, 2012
- Performance & Maintenance Tips August 21, 2012
- Backing Up Your Files August 21, 2012
- Basic Computer Maintenance August 21, 2012
- Boot-Up Error Messages August 21, 2012
- Browser Changes October 21, 2012
- C Cleaner Program – Using August 27, 2013
- CCleaner – Hard Drive September 1, 2014
- Checking/Repairing Hard Drive Errors August 21, 2012
- Cleanmgr + April 25, 2019
- Computer Freezes – What to do When August 21, 2012
- Computer Maintenance August 21, 2012
- Computer Maintenance – Beginners June 29, 2013
- Computer Updates October 29, 2012
- Desktop August 21, 2012
- Free – Wise Disk Cleaner and Registry Cleaner Programs (Mar 2022) January 23, 2022
- Hard Drive Health January 28, 2013
- Maint. Outlook Express and Mail August 21, 2012
- Maintain & Clean up Your Windows 7, 8 & 10 PC (Jun 2017) April 24, 2017
- Monthly Computer Maintenance August 21, 2012
- Networking – Wireless October 21, 2012
- Repairing and Testing Your PC August 21, 2012
- Speed Up Your PC August 21, 2012
- Toolbars August 21, 2012
- Tweak Your PC for Optimum Performance (June 2024) April 21, 2024
- Using the Action Center on a Windows 8.1 PC March 20, 2015
- Using the Control Panel October 21, 2012
- Windows 7 Tips and Tweaks August 21, 2012
- Windows 8 Interface January 28, 2013
- Windows XP – Moving Files to Windows 8.1 September 1, 2014
- XP Updates to End August 27, 2013
- TECHNOLOGY COMMITTEE November 23, 2019
- Volunteer Opportunities September 26, 2014
- Villages August 4, 2012
- Help November 15, 2019


